Welcome to the River! Here, take the keys to maintain your data and policies as you grow with Chrome River.
1. Manage Your Master Data
Allocations / Expense Types / People and Roles / Credit Cards / Invoices
Allocations
Allocations allow users to categorize or charge their expenses to a certain area, such as a department, client, team, or project. To edit an allocation, search and filter within the Allocations section in the Admin area. To add a new allocation, simply use the plus button within the Allocations area. A few unique fields are:
- Parent Number: Optional Client Parent ID.
- GL Account: Fill in this field if the allocation is used as a GL account.
- Unique ID: Chrome River’s unique identification number for the allocation.
- Route Independently: Check this box to allow line items with this allocation to route independently of each other.
- Closed Date: Enter a date to close the allocation. It will no longer be available to select but will remain accessible in the Allocations Admin screen. Historical data associated with the allocation will remain.
Expense Types
Expense Types are different categories of expenses. For example, you may have a GL Accounts with display names as, "Breakfast," "Lunch," "Dinner," "Business Meals," and "Snacks." Those would all fall under a "Meals" expense type. Different expense types require that the employee fills out different details about the expense. Other common expense types are "Lodging," "Airfare," and "Transportation." Expense types may also connect to cost codes. Perhaps breakfast, lunch, dinner, business meals, and snacks all charge to the same Cost Code, but provide helpful, detailed reporting when split out separately for your employees to use.
In the Expense Type section, you may Edit and Create New expense types. Unique fields available are:
- Display Name
- Expense Code
- Per Diem Applicable. Select this checkbox if this type of expense is eligible for per diem.
People & Roles
People
Employee records often need updating; from name changes, to address changes, to activating/disabling, and manager changes. To make any of these changes to an employee's profile in Chrome River, use the People Admin section. Search, edit, and even Add New users easily in this area. Note the Relationship Attributes button is available to review and update permissions.
Roles
Roles are a way of categorizing employees' permissions. You may have permissions that are based on which department or location an employee is assigned to. They may also have multiple roles within an entity (group)—for instance, belonging to AP Review for two different offices. Depending on your company’s rules, each role may have different privileges in different processes.
To add a role, or relationship attribute, tap the blue + button to the right of Relationship Attributes. Select the role, entity type and entity from the drop-down menus and click Save. Use the trash bin icon to delete a role.
Credit Cards
Many organizations will connect corporate credit cards to Chrome River, allowing transactions to automatically import into cardholders' Chrome River accounts. As an administrator, you have the ability to update and manage the credit cards on your own. In the Corporate Credit Cards section, filter to search for a specific card, Edit a card when something changes, Add New to add a new credit card for an employee, or Delete a card if it should no longer connect to Chrome River.
Invoices
For organizations submitting and managing invoices in Chrome River, you may need to add or edit existing Invoice GL Accounts and Vendors over time within the Invoice GL and Invoice Vendor sections.
GL Accounts
Use the Edit button to search and make any changes needed for an existing Invoice GL Account. Be sure to utilize the Status drop-down to note if the specific GL account should be Active or Inactive. Use the + button to create a brand new one. Enter the number, description, and any other applicable or required fields by your organization.

Invoice Vendor
If your organization has connected your Chrome River account to your company's Accounts Payable system, make any vendor changes there and let it feed over to Chrome River. That will ensure that both systems are always in sync. To manually add a new vendor in Chrome River, use the + button. Enter all aditional details for the vendor, then click Add New Address to enter the vendor's address details, such as Payee Name and Currency. Then, Save.
2. Set Your Notifications
Report Tracking Notifications / Email Notifications
Report Tracking Notifications
Users with administrative privileges may use the Report Tracking screen to view where an expense is in the approval process and track the history of changes made to it. This can be helpful if employees are wondering why their reimbursement may be delayed, if an approver is unexpectedly out of the office, or perhaps if your organization is searching for a problem within the approval workflow chain. You may search for the report specifically by its ID, by the Approver, or by the Employee/Submitter's name. Depending on the status of the report, use the Reset Routing or Recall buttons to take action. These will return the reports back to the Submitter if needed.
You may also Reassign pending line items to route them to different approvers. For example, you may find that your organization has just updated its policy the day before on airfare and now requests that all airfare expenses are reviewed and routed through an extra secretary immediately to further track the spend.
Email Notifications
Each user will have options to set their preferred email notification preferences. A few helpful notifications to keep turned on are Expense Owner Paid Notification (notification of paid status of a report), Personal Credit Card (notification of any issues importing transactions), Expense Report Assignment/Invoice Assignment/Pre-Approval Approval (notifications of items pending your review), and Expense Report Status Notification (notification of any status change in the report).
3. Start Your Export
Manual Exports / Automated Exports
Manual Exports
If your organization will be exporting data from Chrome River into another system for payment processing, most commonly, you will be looking for approved line items to do so. In the Export > Approved Expenses screen, use the search parameters if needed and finally, the Export button. You will be prompted to confirm the export in a pop-up window, and click Export. If the line items were exported successfully, a green confirmation message will appear and details of the export will be visible in the Previously Exported list. You will receive an email when the export file is ready. Your export setup will be configured during your implementation phase.
To export Invoices, follow the same steps in the Export > Invoices screen.
Automated Exports
If your organization exports often on a regular schedule, you may set up the Report Scheduler to do so for you. Using the Report Scheduler screen, you can schedule the system to automatically queue all the expense line items that are ready for export. This function is the same as clicking on the Export button. The export will run according to the schedule(s) activated in the Configured Reports section. Use the Automatic Export Queueing menu option to add or edit a new schedule.
The Report Scheduler screen will also allow you to auto-generate Analytics reports and distribute to applicable users. Using the Report Scheduler does require unique permission.
4. Review Missed Transactions
Delete & Reassign / Failed Transactions / Filtered Transactions
Delete & Reassign
The Delete & Reassign Transactions admin screen allows you to delete unused credit card transactions for a single user and to move transactions from one user to another, such as when a user leaves the company before submitting all expense transactions. Search for the transactions in the Delete & Reassign tab in the left-hand panel:
Tap Delete to delete. Tap Reassign to search for a user, and Reassign again to send the transaction to their account.
Failed Transactions
The Failed Transactions admin screen allows you to manage credit card feeds that fail due to incorrect Employee IDs. You may use the screen to assign failed transactions to the correct users and then reactivate them so that the transactions go to the users’ eWallets. You may also delete failed transactions. Use the Assign, Reactivate, and/or Delete buttons to do so.
Filtered Transactions
You may need to filter out unwanted transactions to prevent them from entering the database. The Filtered Transactions screen allows you to access these filtered transactions in the event that you need to recover them. For example, your organization may have created a filter to accept only transactions created after a certain date. If you wish to restore transactions created before that date, you may find and select them on the Filtered Transactions screen, then click REACTIVATE to send them to the appropriate users’ eWallets. You may also delete filtered transactions.
5. Review Rates & Locations
Customer Addresses / Rates / Per Diem Rates / Tax Locations
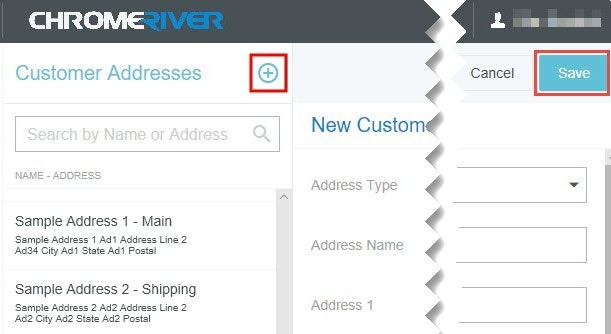
Customer Addresses
The Customer Addresses admin screen allows you to enter your organization's "Ship To," "Bill To" and other addresses that may appear on invoices and purchase orders. These are selectable via address drop-down lists that can be configured for your organization's Invoice Entry Screen and Purchase Order Entry Screen. On the Customer Addresses screen, use the + button to add a new address. Fill in all applicable details, such as the Type of Address (return, shipping, etc.), the address name, and the full address. Click Save. To edit an existing address, simply search within the Customer Addresses screen, and use the Edit button to make your changes.
Rates
Your mileage reimbursement amounts and other expense types that utilize rates will vary by date and are stored here. The Rates Administration screen allows you to add and edit rates with corresponding time frames.
- Add a new rate period for a rate changing in the future (for example, a new mileage rate going into effect for your region at the beginning of next year)
- Create a new rate entirely (for example, your organization just opened a new office in a new country, and now must adhere to that country's reimbursement rates for those employees)
- Edit a rate (for example, your organization has increased its mileage reimbursement rate to encourage more employees to drive rather than fly between nearby cities)
Per Diem Rates
Some companies allow employees to spend a specific amount per day on living and travel expenses associated with work. The amount usually varies by location and may be defined by government guidelines. Users can add a per diem line item to their expense reports in order to be reimbursed. The Per Diem Rates screen allows administrators to manage their organization's rates for specific locations.
To view existing per diem rates: click into the Per Diem Rates screen. Use the search box to filter your results.
To create a new per diem rate for an existing location with defined regions, select the rate location from the drop-down menu and click New. Enter the applicable details, and click Save.
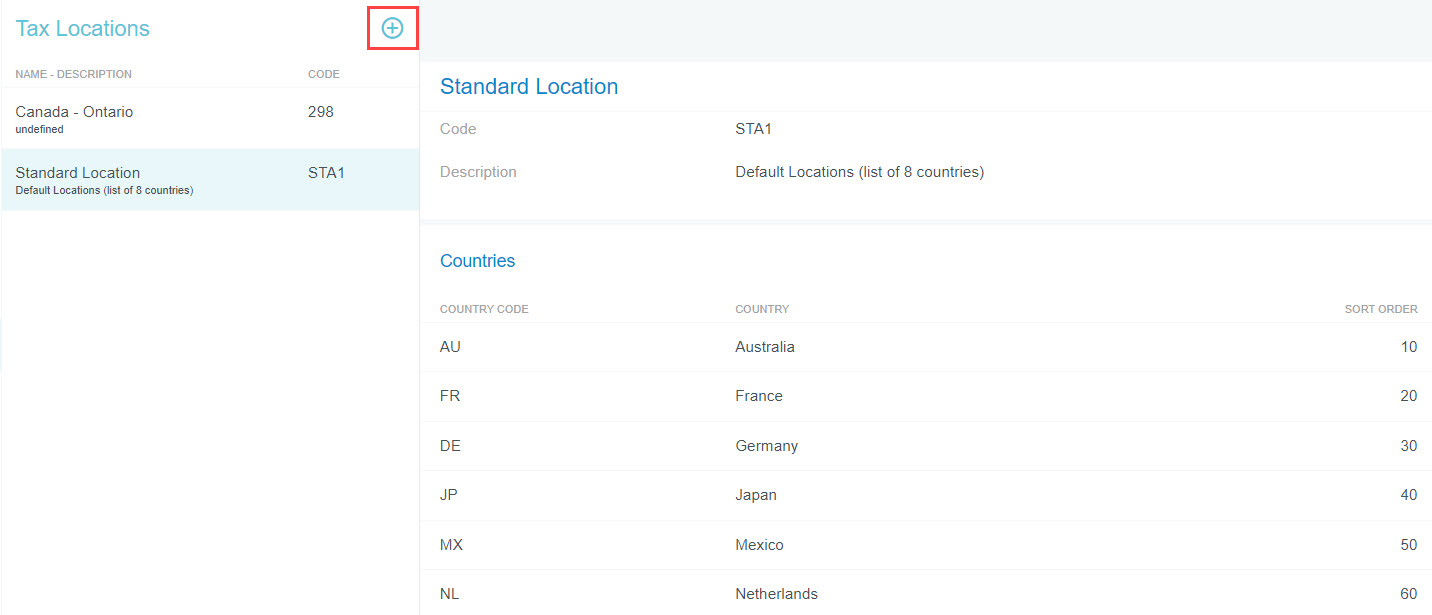
Tax Locations
The Tax Locations screen allows admins to view and manage sets of locations where company policy allows for tax claims. This enables a user to claim tax in countries other than the one associated with his or her profile. Tax locations usually appear in a Location drop-down menu in the Expense Entry screen.
Tap the + button to the right of Tax Locations, and enter the Name, Code and a description, if desired, and tap Save. Tap the + button to add countries to it.
6. Review Your Configuration
Customer Preferences
Customer Preferences
Administrators may use this screen to edit certain global, customer-specific properties related to such categories as allocations, approval routing, EXPENSE and INVOICE. They may also customize such general preferences as the URL to which users are directed upon log-out and the minimum attachment size for emailed receipts.
Click on a category to see which options you may edit. You can view a description of each option by hovering over the Question Mark icon next to the option.
7. Update the User Interface
Rule Manager / Message of the Day
Rule Manager
Within the Chrome River app, business rules are used extensively to implement policies and business controls that are tailored to your organization's needs. A wide variety of rules fire at different points in the application.
The Rule Manager allows you to see and manage all your rules in the selected type (Compliance, Submit Compliance, Approval Routing). A green dot to the left of the rule name indicates the rule is active. A gray dot indicates the rule is inactive.
Message of the Day
Using the Message of the Day area is an easy way to communicate important messages to your users right from the Home screen. Just launched? Officially welcome them to the system and point to some helpful Support and Training resources. New or updated expense policy? Outline it here to give employees a heads up.
In the Message of the Day section of the Admin Settings tab, use the text editor to add your preferred text. You may even add or update your organization's logo on this screen.
8. Understanding Chrome River Instances and Environments
Periodically, we communicate to customers about enhancements and maintenance to the Chrome River application that occur only in certain environments or for customers who are on a specific hosting instance. To help you better understand the terms "environments" and "instances," we have put together the following guide.
Instances / Environments
Instances
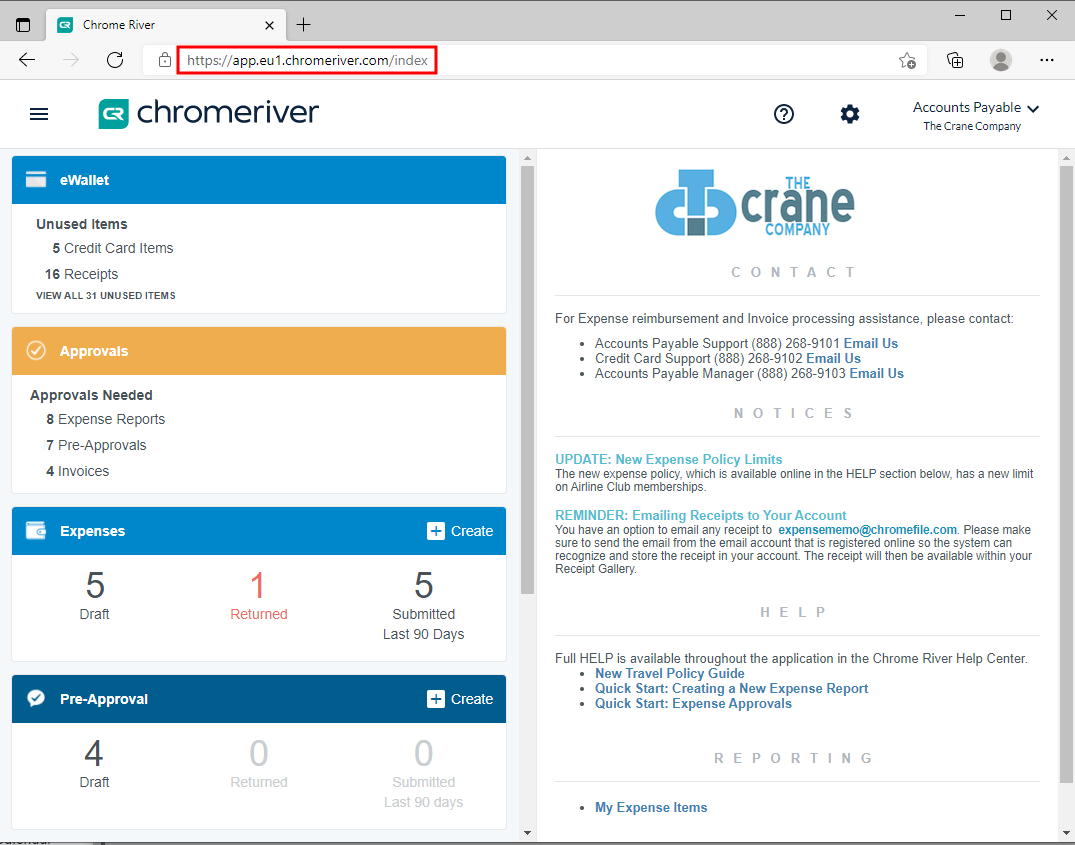
For security and processing efficiency, Chrome River hosts our services and customer data in several physical data center "instances." Occasionally, we may need to perform maintenance on just one data center instance. It is important that you understand on which instance your company is hosted so that you may determine whether you will be affected. Each instance is represented by a unique website URL, and you can easily see in the naming of the URL which data center instance you are accessing.
- C1 Instance: https://app.chromeriver.com
- C3 Instance: https://app.eu1.chromeriver.com
- C5 Instance: https://app.ca1.chromeriver.com
You can identify your organization's instance by looking at the URL when logged in to Chrome River. The example below shows a customer accessing the EU Instance:
Environments
Within each data center instance, the Chrome River application is available in both the live "Production" environment and the “QA” testing environment. You can see in the naming of the URL which environment you are accessing.
Production: The live site containing all of your company's current data. Note that "prod" does not appear in the URLs for the Production site:
- C1 Prod Environment: https://app.chromeriver.com
- C3 Prod Environment: https://app.eu1.chromeriver.com
- C5 Prod Environment:https://app.ca1.chromeriver.com
QA: A testing site created from a copy of the data on the live site that allows you to try new features, rules and changes before they are implemented for all users in the Production site:
- C1 QA Environment: https://qa-app.chromeriver.com
- C3 QA Environment: https://qa-app.eu1.chromeriver.com
- C5 QA Environment: https://qa-app.ca1.chromeriver.com