Welcome to Emburse Chrome River! Chrome River will make it easier than ever to submit your expense reports and invoices. Click any section below to learn more. Get started now!
1. Getting Started
Login Credentials / Complete Profile
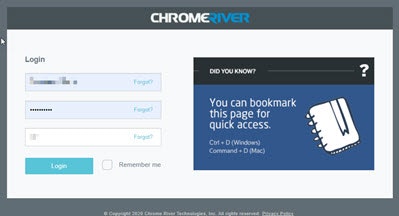
Login Credentials
You will receive your login credentials and your login URL from your organization.
Forgot your username or password? Enter FORGOT in either of those fields and you will be prompted to reset.
Some organizations will instruct you login to Chrome River directly from an existing system portal, such as your company's intranet or system portal. In this case, you will not have a separate username and and password for Chrome River.
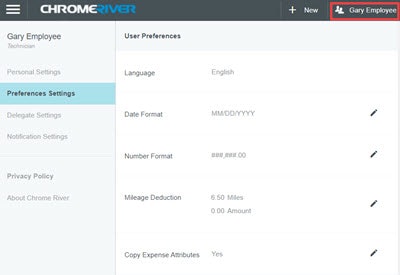
Complete Profile
When logging in for the first time, the best place to start is with your Profile. A few recommended settings are:
- Add Alternative Email: if you ever receive receipts and invoices in an email address not associated with your Chrome River account, add it here. This will allow you to forward those receipts and invoices into your correct Chrome River account.
- Preferences: Set your recognized date and number formats, especially helpful for international employees.
- Add New Delegate (or Add Approval Delegate): If anyone will be submitting expenses and invoices on your behalf (or approving them), set them up from the start.
- Notification Settings: Tailor the notifications that you receive in your email. For example, you will want to receive notifications of your expense reports and invoice progress after you've submitted for approval.
2. Enter Expenses
App / Email Upload / Credit Card Charges / Business Meals / Hotels / Mileage / Per Diems / Allocations
App
The easiest method to use Chrome River on the go is through our mobile apps. The SNAP app will let you take photos of your receipts to utilize on a future expense report. The Chrome River app will let you access your account and Chrome River on your device as normal if you were using a desktop computer. Download the mobile apps in your local app store.
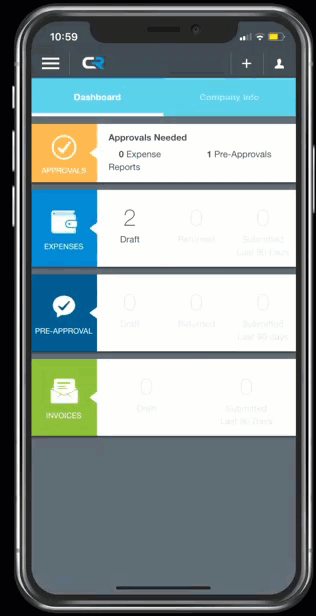
Read More and Print from our Help Center here:
Chrome River App,
SNAP for Android,
Snap for iPhone
Email Upload
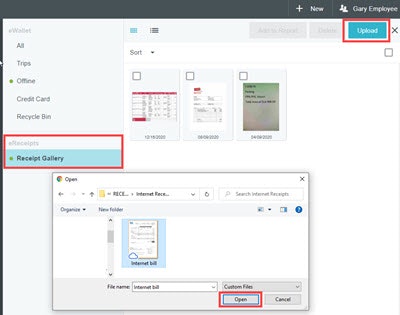
It is common to receive a receipt via email - such as for office supplies you bought online, a hotel receipt, or for an airport restaurant meal. To send these straight into your Chrome River account, simply forward the email to the address listed on your home screen. Be sure that the email is coming from an email address associated with your Chrome River account. The emailed receipt will then load into your Receipt Gallery.
Uploading your receipt can be an easier method for multi-page receipts, such as cell phone bills. First, scan the receipt onto your computer. Then, use the UPLOAD button found in the upper right-hand corner of the Receipt Gallery (this may also appear as a cloud or camera icon). This will allow you to search your computer for the file and upload directly into your Chrome River account.
Credit Card Charges
Many organizations will establish credit card feeds into their Chrome River accounts for either company corporate cards (if issued), or for your personal credit card if used for business purposes. This means that if you use one of these cards, the transaction details will automatically import into your Chrome River account once they are posted for use on an expense report. These transactions will feed into your E-Wallet. Still submit the receipts that go with them, and when creating your expense report, you will be able to match them up.
In the E-Wallet, click on the transaction you wish to add to your report and drag it to the narrow "Create New Line Item" drop zone that appears over the report header area. The Line-Item Entry screen will appear on the right and any attached receipt images will appear in the viewer on the left. Check the pre-populated line-item details, make any necessary additions or changes, and click Save.

Business Meals
Entering a meal requires the general details; the date of the meal expense, usually which meal it was (breakfast, lunch, dinner, and/or snack), and the amount with a receipt. However, another "type" of meal expense is a business meal. A business meal is defined as one for work purposes that includes a guest or guests, which impacts the total calculation and how it is divided. Select the Business Meal expense tile. You'll enter the same details as expected on any other meal expense, with an extra section at the bottom to report guests. For an internal guest (a coworker), your organization will have a pre-loaded list to search from for easy entry. For an external guest (for example, a client), simply enter their information after selecting Add An External Guest.
You will also have an area to split the expense as needed. For example, if your lunch should be split and allocated equally between yourself and your coworker, you would enter 50% in both boxes.

Hotels
Hotel receipts will generally have a few charges on them; room, taxes, other separate charges (internet, movies, meals), and any extra fees. Even though you may have to itemize some charges out, first, add the main hotel receipt with the full charge. Then, click Itemize to enter and allocate any of the charges separately, such as breakfast at the hotel cafe, or high-speed wifi for work.

Mileage
Entering a mileage expense is easy because of our Google Maps integration and the ability for organizations to manage their own reimbursement rates. When entering your mileage expense, use the Calculate Mileage button to filter and enter your to and from locations. Use Add Destination if you have several stops. Use Return to Start to add your starting location at the end for a complete round trip. If your company deducts personal mileage for that trip, such as your standard commute. The reimbursement amount will be automatically calculated for you based on your organization's policy.
Per Diems
Some organizations allow per day rates of reimbursement for certain types of expenses, such as meals, lodging, or other incidentals. Your company's administrator has already set the rate reimbursements and limits in the background. All you need to do is log the expense. Search for an expense tile that references Per Diem, which may be a subcategory underneath a more broad category. Enter all of the details, and note the Spent field is inactive because this amount will be calculated automatically based on the location and company policies. Extra fields you may notice are:
The Deductibles panel: This will appear after you have entered a date and a location. It allows you to check off per diem items for which you do not need to be reimbursed.
Travel Day: Meals and incidentals are reimbursed at different rates on travel days: 75% for meals and 100% for incidentals. Check this box to indicate whether a specific date was a travel day.
Additional Deduction: You can reduce your reimbursement by more than the standard allowance by entering the amount in the Additional Deduction box.
You may also have an expense tile for The Per Diem Wizard. Entering this type of per diem expense allows you to enter expenses for multiple days simultaneously.
Allocations
Allocations are your organization's way of categorizing expenses. Common examples are allocating expenses to certain departments, cost centers, projects, and/or clients. You'll find the Allocations field at the bottom when entering a new expense. Start typing and your results will filter. Use the Search for Allocation field to search the whole drop-down list. Use Add Allocation if you need to split the expense and allocate in more than one place.

3. Invoices
Create the Invoice / Create a Vendor / Invoice Templates
Create the Invoice
Adding invoices into Chrome River is very similar to adding expenses, and you will many of the same buttons and screens to work from. If your organization has added the INVOICE module, you will have an Invoice banner on the left hand side of your home screen. Use the + button to select New Invoice to add one. Browse for your invoice image on your computer, or simply drag and drop.
In the header for the invoice, you'll be prompted to enter details such as the Vendor Name, Invoice Number, Date, and Amount. As you scroll through the invoice sections, you'll find fields to enter in the rest of the details, such as Description, Special Handling options, Comments, Allocations, and any other fields your organization requires. Use Save to save your invoice details to finish later. Use Submit to send through to your approver.
Just like receipts, you may also forward emailed invoices to your account, in addition to faxing. To fax, find your cover page using the button with three dots in the upper right-hand corner.

Create a Vendor
Occasionally, when creating a new invoice or purchase order, the vendor you need may not be available in the vendor search drop-down menu. You can create a temporary new vendor for the invoice or purchase order and then have your vendor administrator add the new vendor to your accounting system. Inside the Vendor Name box, use the + Create Temporary New Vendor link to display a window where you will enter the vendor name. Click Create, and then fill in as much information as you have about the vendor, and Submit. The vendor will then be available for you to use on your invoice, and will also be sent to a reviewer in your organization to review for permanent entry.
Invoice Templates
For repetitive invoices from the same vendors, you have an option to save an invoice as a template for easier and faster submission later. These are particularly useful for shared expenses that are allocated among multiple departments rather than a single user.
First, create and complete your invoice details as normal, starting with the Create Invoice button. Be sure to fully allocate as needed, meaning that the invoice amount must equal the sum of the line-item amounts. These allocations will be saved to the template. Click the three dots and click Convert to Template.
To use the saved template on a future invoice, On the Invoice entry screen, click the three dots, then Prior Invoices. Search for the prior invoice (saved as a template), and click Copy. All saved details will then pre-populate for submission.
4. Review & Approve
Approve from Email / Approve in the Application
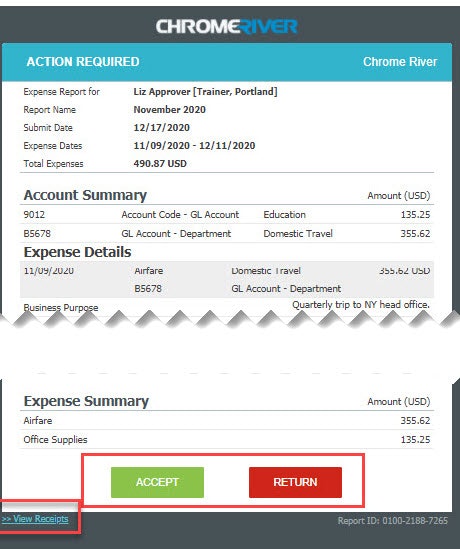
Approve from Email
Chrome River will email you expenses that require your approval. You may find this easier while on the go, if you have a number of invoices or expense reports that require your approval, or simply just to save yourself a few clicks if the invoice is within policy. Use the View Receipts link at the bottom for a closer look at any receipt images. Simply tap the ACCEPT or RETURN button within the email. If you do not receive HTML-formatted emails, just forward the email to either approve@ca1.chromeriver.com or return@ca1.chromeriver.com. Be sure the email is coming from the email address associated with your Chrome River account.
To add questions or comments, simply type them in the body of the email, above the forwarded text, then click SEND.
Approve in the Application
As a designated approver, you will have an extra Approvals ribbon on the left-hand side of your home screen. You'll find a list of items pending your approval here. If there are many, you will have options to search (using the magnifying glass icon) through list and even filter (using the Create New Filter link) the results. These functions can be helpful if you are part of an approving team. You will also see Reviewing next to any items that your teammates have already opened to view right in the Approvals Needed list. If sorting through the list, the Validated option will present all items with warnings on them for easy review.
All line items without any policy warnings will default to Approved, with a green check mark. You may click Return to reject the line item. When finished reviewing, make your final Return or Submit button selection to move the expense report or invoice out of your account onto the next person (or back to the submitter).
When simply previewing reports, you will have a Return and Approve button right on the same screen.
For a closer look when reviewing, or to approve/return individual line items separately, double click on the report to open all of the line items.